DCS361 - Introduction to Robotics 2021 Fall
背景
麦克纳姆轮 (Mecanum wheel) 是一种全向轮,其设计原理是在车轮的外环中安装了与轴心成45度角排列的滚子与地面接触,转动时摩擦力会产生与轮轴呈45度的反推力,这个斜向推力可以被分为纵向和横向两个向量。整个车体由两对拥有滚子镜像排列的麦克纳姆轮所驱动,每个车轮各自会产生相应的向量,这些向量的合力决定了车体最终的活动状态。通过调节各个车轮独自的转向和转速,可以实现整个车体前行、横移、斜行、旋转及其组合等运动方式。
环境
Windows 10 21H1 19043.1237
Webots R2021b
实验步骤
构建世界和地面
- 在左侧点击
World Info -> coordinate System修改坐标系,将NUE坐标系改为ENU,这样使得z轴朝上。保存后重启Webots。 - 确保仿真没在运行。首先右键漆黑一片的界面,选择
Add New,选择添加PROTO nodes (Webots Projects) ->objects->backgrounds中的TexturedBackground (Background)和TexturedBackgroundLight (DirectionalLight)。现在可以看到不再一片漆黑,如果还看不见东西,选择View->Change View,随便换一下就可以看见远处的山了。 - 选择
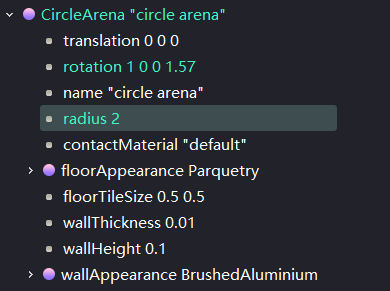
Add New -> PROTO nodes (Webots Projects) -> objects -> floors -> CircleArena (Solid)添加地面。此时可以看见地面悬浮在半空中,但是是垂直的。我们可以打开View -> Optional Rendering -> Show Coordinate System来查看世界坐标系。通过左侧调整rotation参数,我们将它绕x轴旋转1.5707963267949rad,这样就与地面平行了。我们可以将radius调为 2,这样会大一些。
构建机器人
-
现在我们来建造属于自己的机器人。添加
Base nodes -> Robot,可以看到左侧出现了Robot对象。 -
现在添加机器人刚体。在
Robot对象的children节点下右键Add New添加Base nodes -> Shape节点,然后点击它,在左下DEF那里为他改名叫 Body,便于下面碰撞边界的使用。 -
现在修改机器人外观形状,在
Shape -> geometry处右键Add New,添加Base nodes -> Box,可以看到世界中出现了一个白色的立方体。展开左侧geometry Box,可以调整size。这里调整为:x=0.3m, y=0.2m, z=0.08m. -
刚才我们创建了外观形状,现在要定义它物理碰撞边界。先在左侧
Robot -> boundingObject节点右键Add New添加USE -> Body (Shape),这样我们的碰撞边界就和形状一模一样了。 -
现在给它物理属性,令它受重力影响。如果不先定义碰撞边界,则一旦有了重力小车便会掉穿过地板。在左侧
Robot -> Physics节点右键Add New添加Base nodes -> Physics。这时候我们尝试把小车往上提,打开仿真,可以看到小车掉在地板上弹了几下。
构建轮子
普通轮子
-
现在给小车添加铰链,在 Robot 对象的 children 节点下右键
Add New添加Base nodes -> HingeJoint节点。- 现在为铰链一端添加电机,选择
HingeJoint -> device右键Add New添加Base nodes -> RotationalMotor,然后改名为motor1,因为程序中想调用电机,要先通过名字获取它的句柄。 - 现在为铰链另一端添加轮子,选择
HingeJoint -> endPoint右键Add New添加Base nodes -> Solid. - 然后选择
HingeJoint -> endPoint -> children右键Add New添加Base nodes -> Shape. - 然后选择
HingeJoint -> endPoint -> children -> geometry右键Add New添加Base nodes -> Cylinder. - 在
HingeJoint -> endPoint -> children -> geometry把轮子大小改成半径0.06m,高0.05m. - 在
HingeJoint -> endPoint把轮子位置改成 x=0.1m y=-0.15m z=0m.
- 现在为铰链一端添加电机,选择
-
现在把铰链装到小车上。选择
HingeJoint -> jointParameters右键Add New添加Base nodes -> HingeJointParameters,并在HingeJoint -> jointParameters -> anchor修改安装位置,安装在 (0.1, -0.15, 0) 处,在axis处把轴改为 (0, 1, 0). -
现在一个带有驱动的轮子就做好了,我们需要复制另外三个然后修改他们的锚点,这样就大功告成。
复制麦轮
从TA发的世界复制4个麦轮过来,具体步骤是在TA发的世界里右键轮子选择导出,然后在自己的世界里选择 Robot -> children 右键 Add New,选择 import...,导入之前导出的轮子即可。
设置摩擦材质
-
添加两个
ContactProperties节点,通过此节点可以定义Solid节点碰撞时的行为。右键选择WorldInfo -> contactProperties,Add New,添加Base nodes -> ContactProperties,执行两次。 -
调节两个
ContactProperties节点的参数如下。主要是material1、coulombFriction、frictionRotation、forceDependentSlip这几个参数。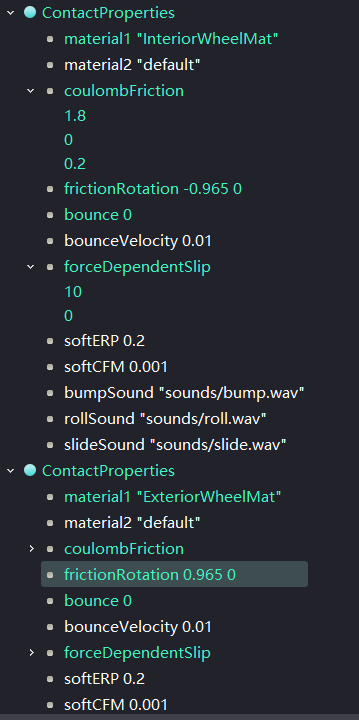
添加机器控制器
向导 -> 新机器人控制器 -> C++。现在创建了含有控制器的文件夹。Robot -> controller把我们刚刚创建的C++文件设为机器人控制器。
编写机器人控制器
-
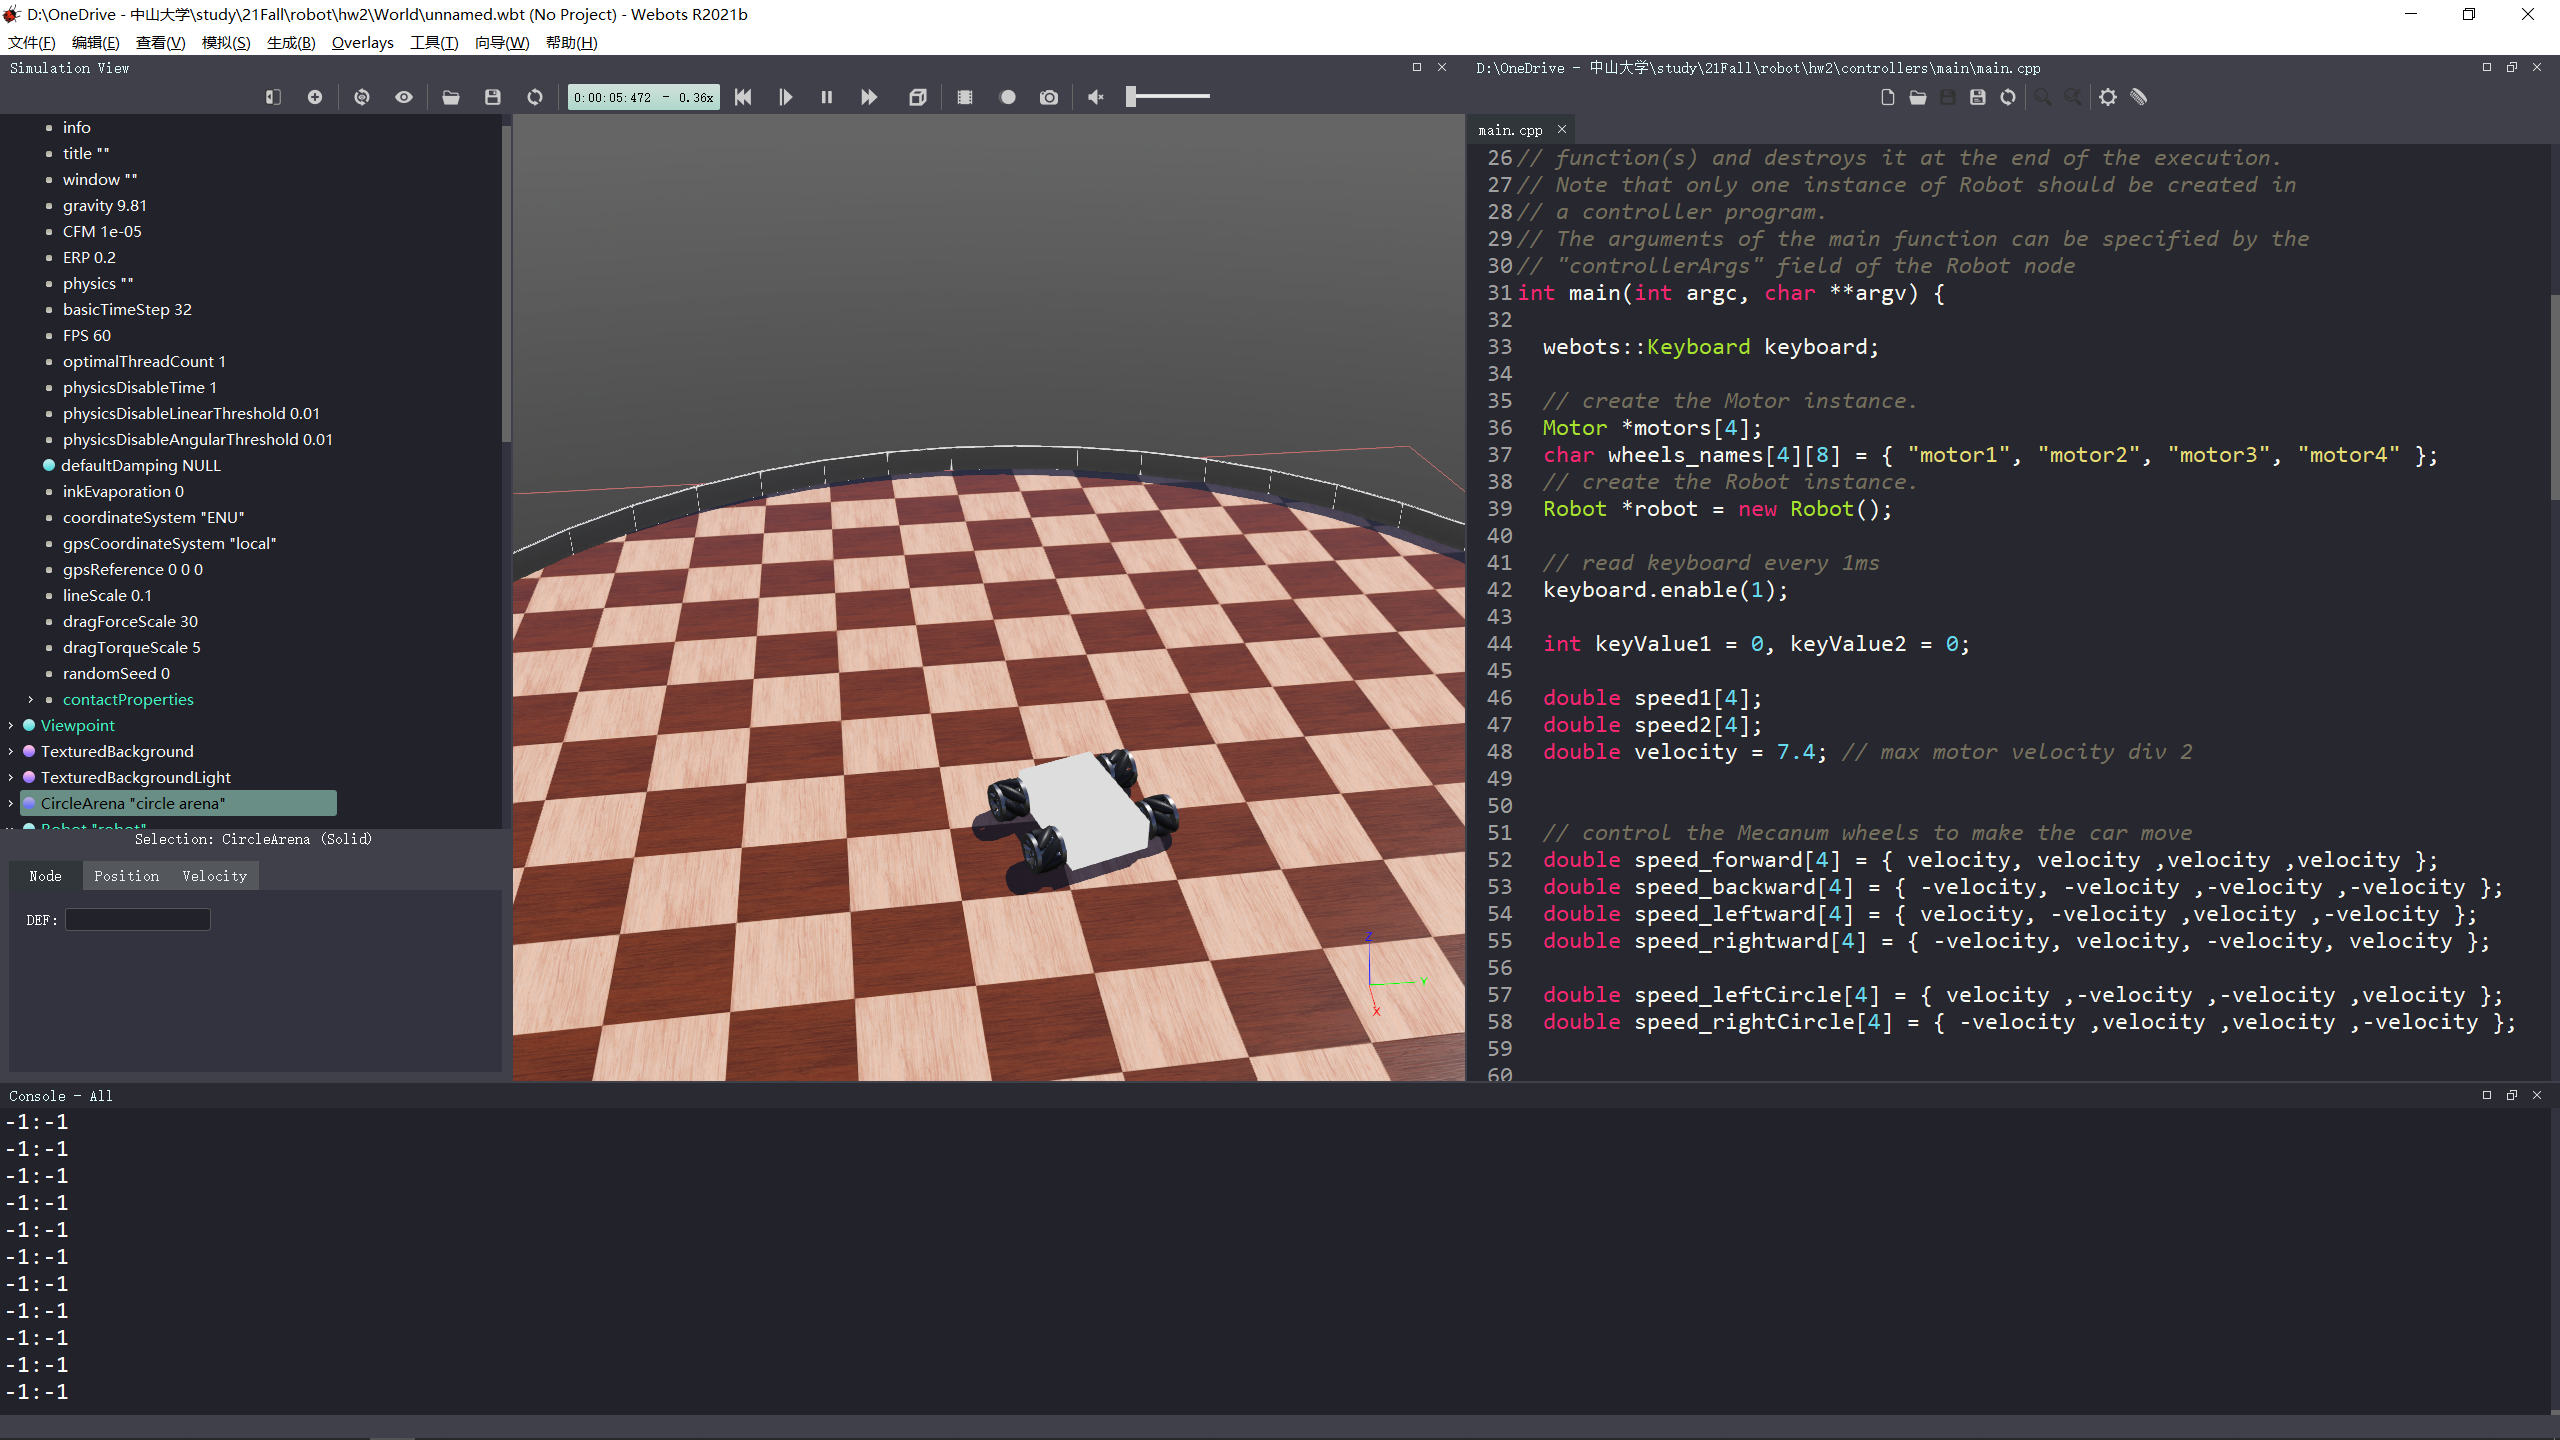
首先需要 include 头文件,必要的是这三个 Webots 的库,其他C++库不在此展开。然后可以选择使用
webots命名空间。0 1 2 3
#include <webots/Robot.hpp> #include <webots/Motor.hpp> #include <webots/Keyboard.hpp> using namespace webots;
-
进入主函数,构造键盘、马达和机器人对象,然后定义键盘读取缓冲区,要有两个缓冲区,因为我们可以合成两个方向,因此也要定义两个速度数组。设置每1ms读取一次键盘输入。后面为啥要把速度设为7.4呢?因为我们的马达定义了最大速度14.8,超速就会有Warning。定义为最大速度的一半这样合成的时候就不会超过最大速度了。
0
1
2
3
4
5
6
7
8
9
10
11
12
     webots::Keyboard keyboard;
     // create the Motor instance.
     Motor *motors[4];
     char wheels_names[4][8] = { "motor1", "motor2", "motor3", "motor4" };
     // create the Robot instance.
     Robot *robot = new Robot();
     // read keyboard every 1ms
     keyboard.enable(1);
     int keyValue1, keyValue2;

     double speed1[4];
     double speed2[4];
     double velocity = 7.4; // max motor velocity div 2
-
根据麦轮的原理把小车的动作中车轮的速度方向抽象起来。
0
1
2
3
4
5
6
7
     // control the Mecanum wheels to make the car move
     double speed_forward[4] = { velocity, velocity ,velocity ,velocity };
     double speed_backward[4] = { -velocity, -velocity ,-velocity ,-velocity };
     double speed_leftward[4] = { velocity, -velocity ,velocity ,-velocity };
     double speed_rightward[4] = { -velocity, velocity, -velocity, velocity };

     double speed_leftCircle[4] = { velocity ,-velocity ,-velocity ,velocity };
     double speed_rightCircle[4] = { -velocity ,velocity ,velocity ,-velocity };
-
然后我们获取世界的时间步长,决定了仿真的模拟速度。之后初始化马达速度为0,目标距离无穷远。
0
1
2
3
4
5
6
7
8
9
     // get the time step of the current world.
     int timeStep = (int)robot->getBasicTimeStep();
     // init motors
     for (int i = 0; i < 4; i++) {
     motors[i] = robot->getMotor(wheels_names[i]);
     motors[i]->setPosition(std::numeric_limits<double>::infinity());
     motors[i]->setVelocity(0.0);
     speed1[i] = 0;
     speed2[i] = 0;
     }
-
进入主循环,这里我们在每次循环读取两个键盘输入,然后判定。其中WASD是上下左右,QE分别是向左向右自转。判定完就设置速度,最后两组速度相加传入马达。
0
1
2
3
4
5
6
7
8
9
10
11
12
13
14
15
16
17
18
19
 while (robot->step(timeStep) != -1) {
     keyValue1 = keyboard.getKey();
     keyValue2 = keyboard.getKey();
     if (keyValue1 == 'W') {
             for (int i = 0; i < 4; i++)
                 speed1[i] = speed_forward[i];
     } else if (keyValue1 == 'S') {

         ...

     }

     if (keyValue2 == 'W') {
         ...
     }
     // set velocity
     for (int i = 0; i < 4; i++) {
         motors[i]->setVelocity(speed1[i] + speed2[i]);
     }
 }
结果与分析
运行界面如下,小车可以自由正确地运动,同时按下两个按键,速度也能合成。
期间坎坷
实现过程中遇到了一个问题,就是我一开始只复制了一个麦轮,妄想通过修改另外三个轮子的铰链锚点和位置,铰链、马达、传感器的名字,来实现四个麦轮。最后车前进的时候是往左前行驶的。通过分析才发现每个轮子的上面的轱辘都不太一样。
另一个问题是小车跑起来之后有点打滑,解决方案是修改摩擦系数或者修改小车受到重力。我修改了密度,把它从1000增加到10000,小车稳重了许多。
This work is licensed under a Creative Commons Attribution-NonCommercial-ShareAlike 4.0 International License.